Contact Us

If you'd like to get in touch you can reach us at the following email addresses.

General Email: contact 'at' cardboardkeep.com

Press Enquiry: press 'at' cardboardkeep.com

Alternatively use the form on the right to contact us with general or press enquiries.

Cardboard Keep Video Policy
We hereby grant permission to any and all video content creators to use footage and gameplay of our games, and to place advertisements for the purpose of monetization in their videos of our games.
Please insert a link to our website in the video description, and feel free to contact us to let us know about the videos you make!


123 Street Avenue, City Town, 99999

(123) 555-6789

email@address.com


You can set your address, phone number, email and site description in the settings tab.
Link to read me page with more information.

combat-planning-blurred.jpg

Blog

Filtering by Category: Technical Art

Dev Log: Warden's Mecanim animations

Timothy

MecanimPost-CoverPage.png

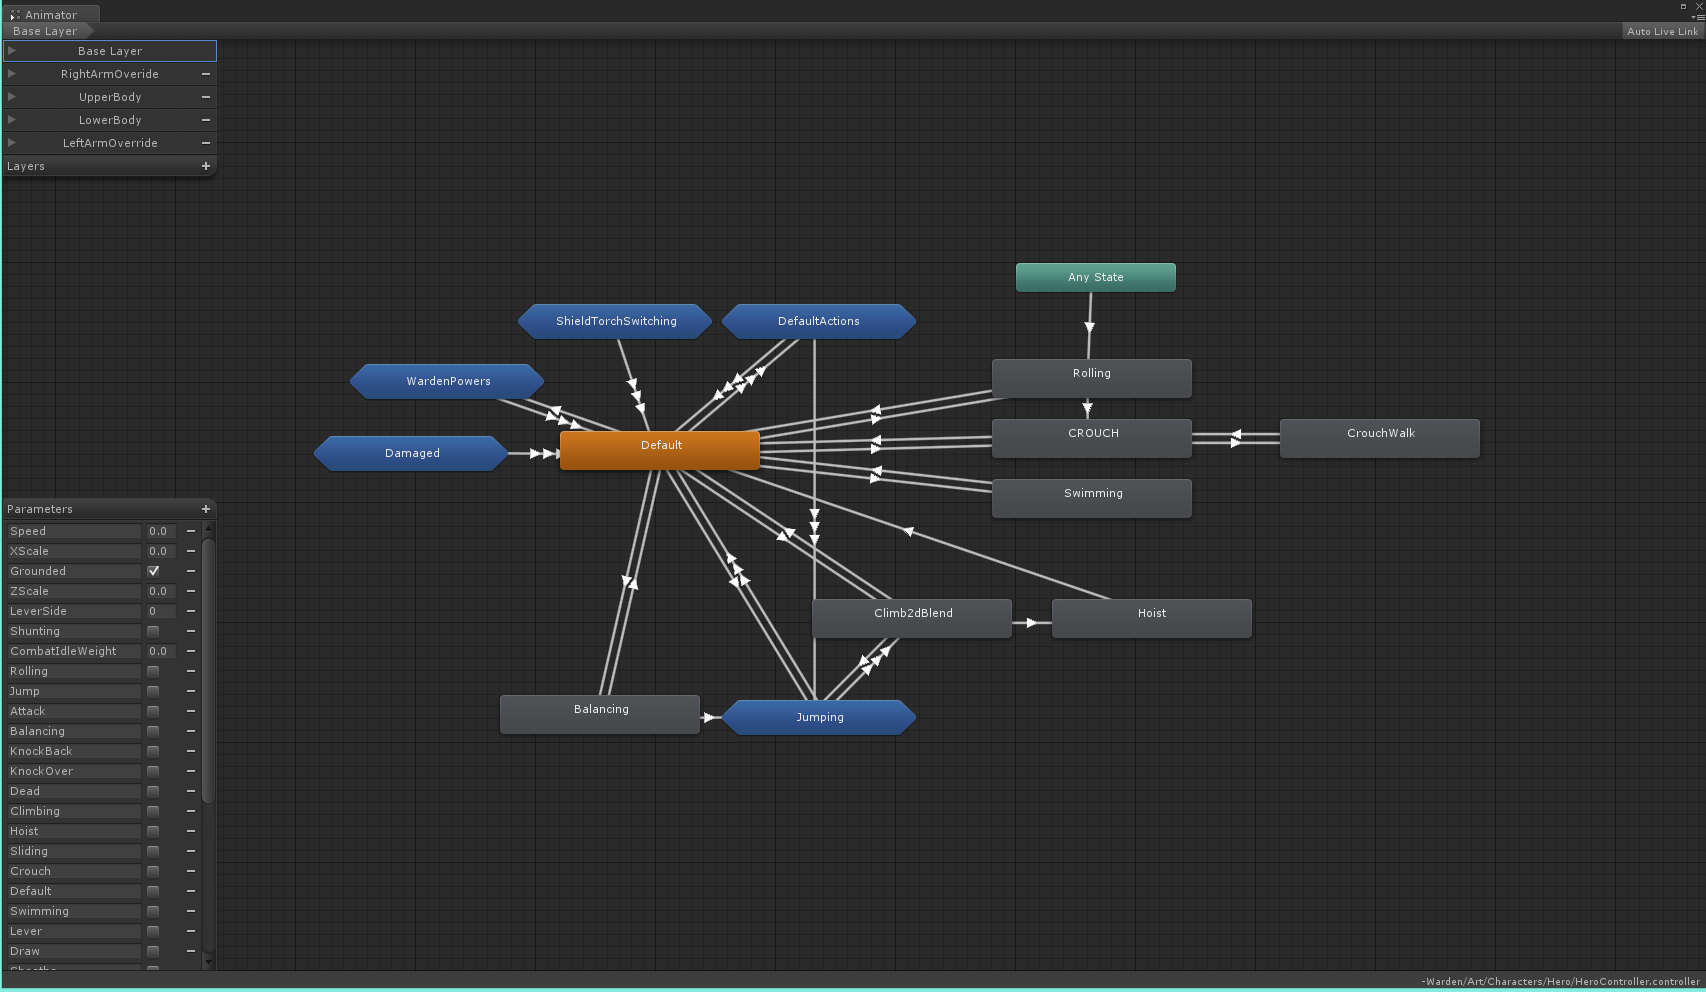
Hey folks,Let's look at Unity 3D’s Mecanim animation system and how we have implemented it in Warden for our playable characters.

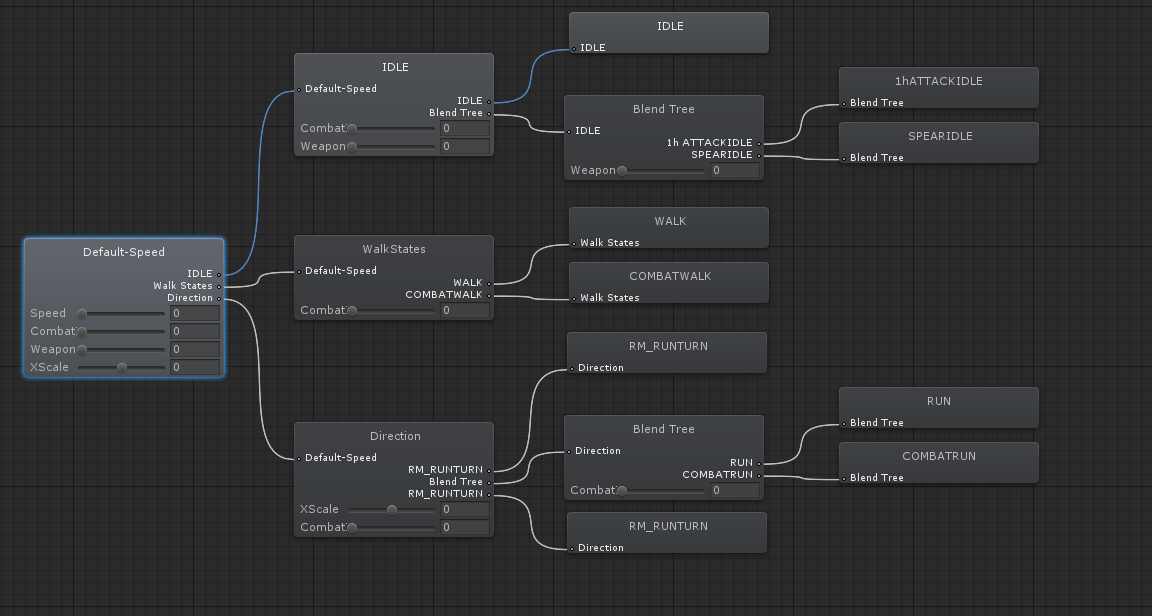
Every animation the character plays transitions from it’s “Default” state. Default is a series of nested blend trees to blend between Idle, Walk and Run animations, as well as directional movement such as sidestepping and leaning into a turn. Almost all the other states in the tree return to this point with a trigger called “Default”. From the Default state we branch in many directions for all the different kinds of movement and actions the player can do. For example jumping, crawling and attacking.

To keep the state machine tidy we organize states into key categories such as Damage, Jumping, and Default Tasks. The Jump state tree is quite simple. There are three animations, one for take off, one for falling and one for landing. When the player hits the jump key, we hit the “Jump trigger” to push the animation into the beginning of the jump. From here based on the “exit time” of the animation the character naturally reaches the apex of their jump and begins falling, while automatically transitioning into the fall animation. Finally, we detect if the character is grounded again and when they are the “Land trigger” is hit and the animation for landing is played.

We also have a catch all for when the player falls off ledges. This allows the character to transition into the falling state without jumping.

Jumping!
Jumping!

The attack tree was initially quite a simple and tame beast. After many attempts we solved the issue of having multiple weapons and styles with an integer to determine weapon type. Each attack can combo. We count where the player is up to in their attack combo to determine which attack animation should be played. Then we check what their current weapon’s “type” is using the aforementioned integer and play the relevant animation.

For example, the player has a sword. They press attack. From default the animation transitions into attack combo 01 which is a blend tree containing all of our weapon types first combo animation. The sword is weapon type 0 and thus the combo blend tree is set to “0” and that animation is played. If the player was using a spear, their weapon type would be 1 and a different animation would have played.

We found Mecanim's triggers to be a godsend. Initially, when we started work on Warden, triggers didn't exist yet and we had to do a lot of nonsense with bools to get it all to work. All of the Warden playable characters share the same animations, re-targeted across multiple rigs using Mecanim's humanoid re-target system. This is a real time saver as our animator Rob doesn't need to create unique animations for every single Warden we want in the game, allowing more time to be spent making the animations better.

tim512-e1364449698122-150x150.png

Hope this was insightful, if you have any questions about using Mecanim, comment below or drop us an e-mail! Peace out. Tim

Dev Blog: Fixing Texture Banding in Unity

Timothy

Hey Devaroos, Just a quick post from me today, but I had fun optimizing our current project, mainly looking at textures and materials. Whilst plumming the depths of the Unity project and fiddling with the import settings of our assets I discovered a surprising and quite frankly beautiful act of compression.

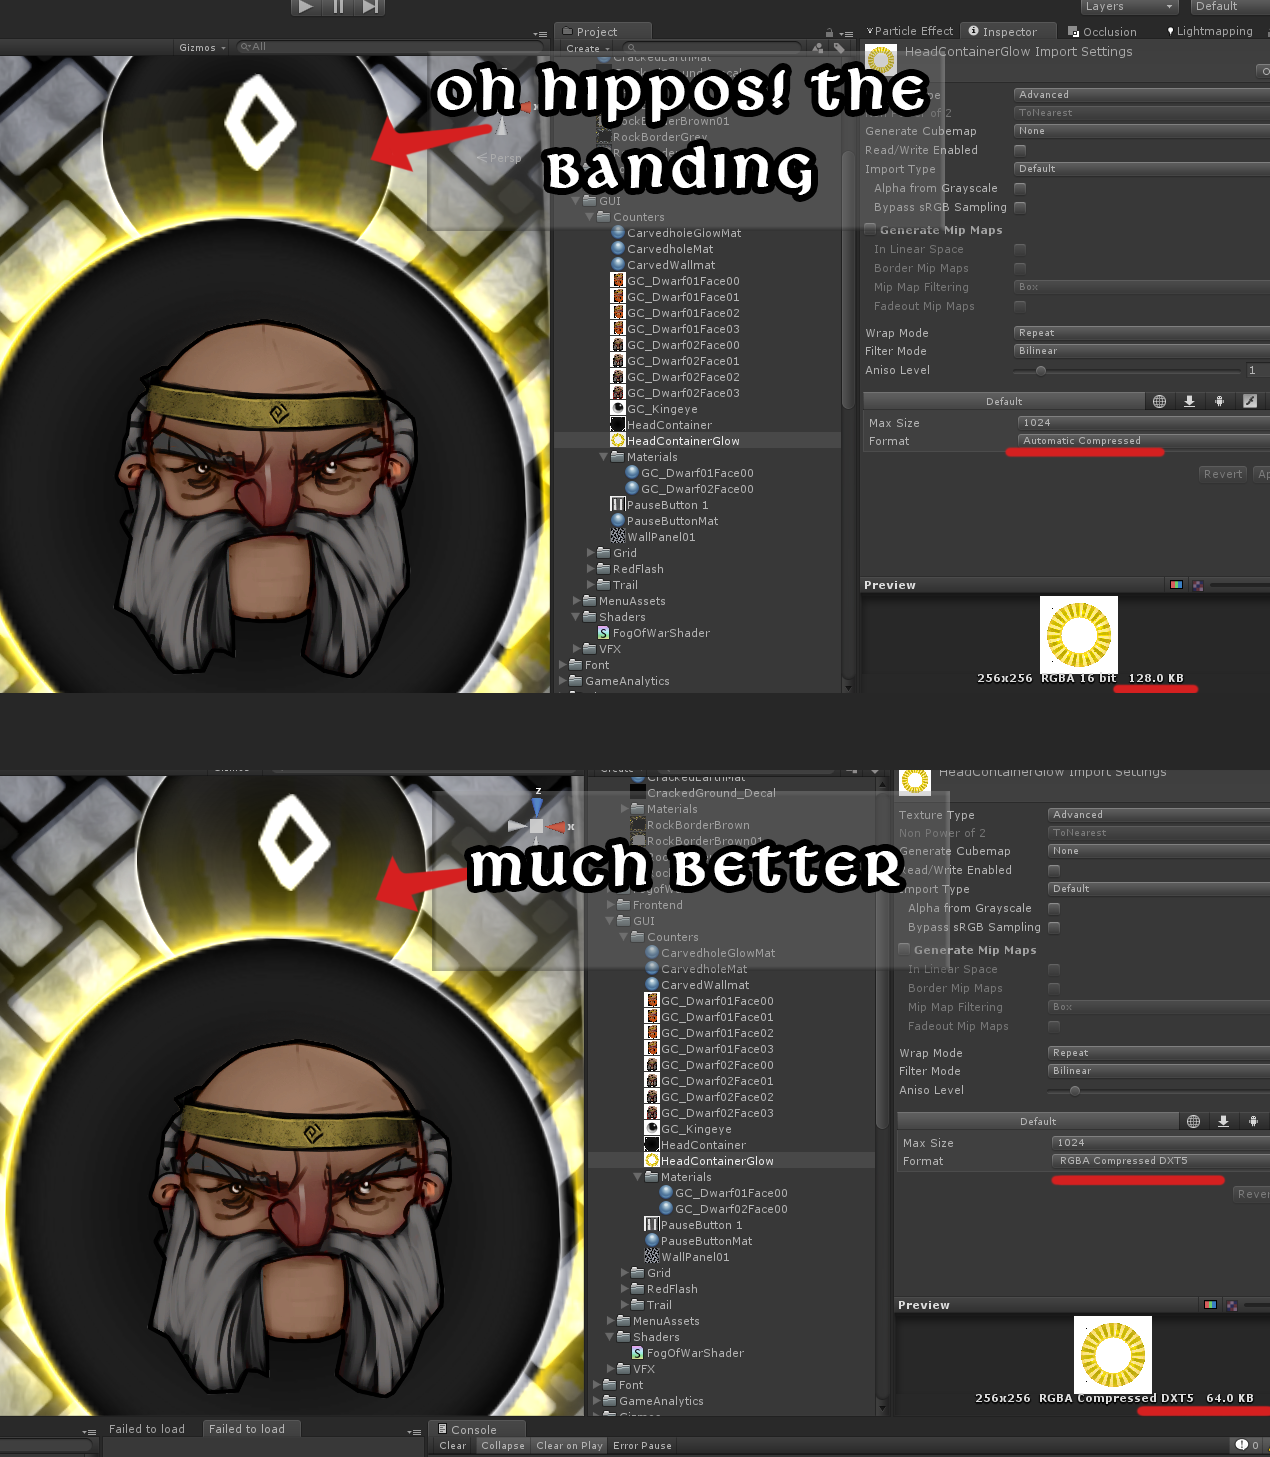
The default "automatic compression" in Unity doesn't like colour gradients. If one was to change the compression from automatic to DXT5 compression we not only have no more banding, which is awesome, but it also halves the size of the texture.

BandingFixOur programmer loved this, and the game looks better!

So if you are having trouble with a texture banding or having its colours blend horrifically, try changing the Texture Type setting to advanced, and the compression to DXT5. I encourage you to try out all the compression that Unity offers, as some can reduce the size immensely while maintaining or even improving perceived quality.

Thanks for your time, I hope this helps out.

Tim.

Dev Blog: Alpha Outlines

Timothy

Hey guys,

In this blog post we are going to take a look at the use of alpha, and the horrible artifacts that can occur in it’s implementation. There are a wide variety of shaders that utilize the alpha channel of a texture to create transparent objects. These can range from glass to grass, but we are focusing mainly on how alpha can get those garish white or black outlines even though the alpha channel is crystal clear.

Examples02

The problem lies essentially in mipmapping, which is texture LoDing (Level of detail) using texture compression. So we need to understand that when the texture is compressed or mipmapped, the texture is changed from how one painted it. This is effectively rescaling the image and blurring the alpha.

Suddenly the texture that was once saying only show the nice tree leaves, is now telling the shader to show a slightly larger outline around the shape, due to the blurring of the texture. There are few options available here.

  • Don’t use mipmaps and texture compression (such as disabling them in unity).

  • Paint your own mip maps.

  • Paint an average approximation of the colour filling the rest of the texture.

Examples

By far the easiest and quickest solution is to fill the background of the image with a colour close to the borders of your image.

Alpha can cause a lot of annoying little problems, and I see this one pop up all the time. I hope it can help you guys out and if you have any tips for working with Alpha images, leave a comment.

Tim out.

Dev Blog: Amplifying Normal Maps

Timothy

AmpNormsExample

Hey everyone, in this blog post we’re going to have a look at normal maps and how to amplify their strength. There are a huge array of tools to create normal maps, from in-package baking such as Maya or Max, to specialized tools like Xnormals or even derived from textures ala Crazy Bump and Ndo2. Baking out a normal map is pretty easy, so I tend to use a few different methods, Xnormals, 3d Coat, Zbrush and Ndo2 are preferred but all offer different levels of quality in the normal map.

As such, I’ve developed a technique in Unity 3D for amplifying the strength of a normal map through the shader and providing a variable in the inspector that will give the artists more control of how powerful the normal map shows through.

The theory is really quite simple. Break the normal map into its separate channels (RGB). We don’t want to alter the “angles” of the normal map so we ignore the red and green. The blue controls how much it “pushes out” and as such if we amplify that, then it will appear stronger.

We can look at it like this; NRGB = The normal maps red green and blue values. Take Blue from that and plug it into a power expression. It’s pretty important to make sure the blue channel goes into the base value.

AmpNormsTree

I use this technique in the Strumpy Shader Editor. Using the assemble node I can combine the three channels together again. You could use a split node to make sure it was only taking the blue channel into the pow node but the difference is negligible and thus unnecessary clutter. The Float input allows myself or any of the artists to use the shader in Unity and control the strength of their normal maps.

Making tools like this is not only quite satisfying but the utility of them really helps speed up future projects as well. If you guys have any thoughts on this technique I’d love to hear them.

Cheers guys, Timothy.tim512